Streamlining Neuroimaging Processing with Nipoppy
Reproducible neuroimaging principles: 3. Software management.
Standards: BIDS.
Challenge
Managing neuroimaging pipelines often involves handling complex datasets and multiple tools, all while ensuring reproducibility throughout the process. The challenge lies in:
- Data complexity: Neuroimaging data can be large, multimodal, and require precise handling to maintain data integrity.
- Workflow management: Keeping track of different pipeline steps, tools, and configurations can be overwhelming, especially in collaborative projects.
- Reproducibility: Ensuring that workflows are transparent, repeatable, and compatible with community standards such as BIDS.
Exercise
In this tutorial, you will learn how to use nipoppy to manage a simple workflow. In this example, we
start with data that has already been converted into the BIDS representation. If your data is not in BIDS, the instructions at
Nipoppy addresses this more complex task. The workflow in this example is simply a
preexisting MRIQC container available at DockerHub. Containerization of more complex workflows are addressed in the Containerization Tutorial.
The example facilitates the deployment of the indicated container across all the content of the indicated dataset (subjects, sessions, etc.)
and makes the derived content available to the local metadata store (aka ReproPond) for query with NeuroBagel. The key points of this exercise are:
- Initializing a project: Setting up a project directory and configuring necessary files for managing data and pipelines execution on the BIDS dataset ds004101 from OpenNeuro.
- Running the pipeline: Executing the MRIQC 23.1.0 pipeline our example dataset.
- Tracking progress: Monitoring the pipeline’s status and ensuring all steps are completed successfully.
- Make results available: Provide the status and results to a NeuroBagel node.
Before you start
You should be comfortable working at the command line.
Install the following software:
We will utilize the dataset ds004101 from OpenNeuro, which includes structural and functional MRI data for 9 subjects (2 sessions), as our working example. The dataset can be downloaded by following instructions here.
Step by step guide
Step 1: Initialize the Nipoppy dataset
Run the following command to create a Nipoppy dataset and populate it with the BIDS data:
nipoppy init --bids-source <path_to_ds004101> nipoppy_exampleThis command creates a folder named nipoppy_example with subdirectories for raw data, processed (derivatives) data, pipeline configuration files, logs:
nipoppy_example/
├── bids
├── code
├── containers
├── derivatives
├── global_config.json
├── logs
├── manifest.tsv
├── pipelines
│   ├── bidscoin-4.3.2
│   ├── dcm2bids-3.1.0
│   ├── fmriprep-20.2.7
│   ├── fmriprep-23.1.3
│   ├── fmriprep-24.1.1
│   ├── freesurfer-6.0.1
│   ├── freesurfer-7.3.2
│   ├── freesurfer_stats_and_qc-0.1.0
│   ├── heudiconv-0.12.2
│   ├── mriqc-23.1.0
│   ├── qsiprep-0.24.0
│   └── qsiprep-1.0.0rc1
├── scratch
├── sourcedata
└── tabular
Nipoppy automatically generated a manifest file from the BIDS dataset. This file is considered the ground truth for which participants and sessions are available for processing.
participant_id  visit_id    session_id  datatype
09114           1pre        1pre        ['anat', 'func']
09114           2post       2post       ['fmap', 'func']
09160           1pre        1pre        ['anat', 'func']
09160           2post       2post       ['fmap', 'func']
09260           1pre        1pre        ['anat', 'fmap', 'func']
09260           2post       2post       ['fmap', 'func']
09300           1pre        1pre        ['anat', 'fmap', 'func']
09300           2post       2post       ['fmap', 'func']
09380           1pre        1pre        ['anat', 'fmap', 'func']
09380           2post       2post       ['fmap', 'func']
09381           1pre        1pre        ['anat', 'fmap', 'func']
09381           2post       2post       ['fmap', 'func']
10134           1pre        1pre        ['anat', 'fmap', 'func']
10134           2post       2post       ['fmap', 'func']
10332           1pre        1pre        ['anat', 'fmap', 'func']
10332           2post       2post       ['fmap', 'func']
10570           1pre        1pre        ['anat', 'fmap', 'func']
10570           2post       2post       ['fmap', 'func']
The nipoppy status prints out a summary of the dataset, including the number of participants who are in BIDS or have completed a pipeline.
nipoppy status nipoppy_example For now, the dataset only has BIDS data.

Step 2: Modify the global configuration file
The nipoppy init command created the configuration file at nipoppy_example/global_config.json. This file needs to be updated with information specific to the dataset and your computing environment. By default, the beginning of the global config file looks like this:
{
   "DATASET_NAME": "<DATASET_NAME>",
   "VISIT_IDS": [
       "<VISIT_LABEL>",
       "<OTHER_VISIT_LABEL>"
   ],
   "SESSION_IDS": [
       "<SESSION_LABEL>",
       "<OTHER_SESSION_LABEL>"
   ],
   "SUBSTITUTIONS": {
       "[[NIPOPPY_DPATH_CONTAINERS]]": "<PATH_TO_CONTAINER_STORE_DIRECTORY>",
       "[[HEUDICONV_HEURISTIC_FILE]]": "<PATH_TO_HEURISTIC_FILE>",
       "[[DCM2BIDS_CONFIG_FILE]]": "<PATH_TO_CONFIG_FILE>",
       "[[FREESURFER_LICENSE_FILE]]": "<PATH_TO_FREESURFER_LICENSE_FILE>",
       "[[TEMPLATEFLOW_HOME]]": "<PATH_TO_TEMPLATEFLOW_DIRECTORY>"
   },
...
}
The DATASET_NAME, VISIT_IDS, and SESSION_IDS fields can be updated with the appropriate information, and the SUBSTITUTIONS field can be cleaned up to remove entries that will not be used in the tutorial (e.g., configuration files for BIDS conversion, FreeSurfer license file):
{
   "DATASET_NAME": "ds004101",
   "VISIT_IDS": [
       "1pre",
       "2post"
   ],
   "SESSION_IDS": [
       "1pre",
       "2post"
   ],
   "SUBSTITUTIONS": {
       "[[NIPOPPY_DPATH_CONTAINERS]]": "<PATH_TO_CONTAINER_STORE_DIRECTORY>",
       "[[TEMPLATEFLOW_HOME]]": "<PATH_TO_TEMPLATEFLOW_DIRECTORY>"
   },
...
}
There are still paths that need to be filled in for the SUBSTITUTIONS field:
<PATH_TO_CONTAINER_STORE_DIRECTORY>: a central directory where container images are stored (i.e. if sharing between multiple datasets/projects). This can also be deleted, in which case thenipoppy_example/containersdirectory will be used.<PATH_TO_TEMPLATEFLOW_DIRECTORY>: either an existing directory used by TemplateFlow, or an empty directory where templates will be downloaded.
Step 3: Download the MRIQC Apptainer image
Before running the pipeline, download the MRIQC container in the appropriate directory (either nipoppy_example/containers or the custom path specified in the global config file) using Apptainer.
apptainer build <path_to_container_store>/mriqc_23.1.0.sif docker://nipreps/mriqc:23.1.0Step 4: Run MRIQC on a single participant and session
Use nipoppy run to run MRIQC on a single participant and session. This will take around 15 minutes.
nipoppy run --pipeline mriqc --pipeline-version 23.1.0 nipoppy_example --participant-id 09114 --session-id 1prePipeline outputs are written to nipoppy_example/derivatives/mriqc/23.1.0/output:
nipoppy_example/derivatives/mriqc/23.1.0/output/
├── dataset_description.json
├── logs
├── sub-09114
│   ├── figures
│   │   ├── sub-09114_ses-1pre_desc-background_T1w.svg
│   │   └── sub-09114_ses-1pre_desc-zoomed_T1w.svg
│   └── ses-1pre
│       └── anat
│           └── sub-09114_ses-1pre_T1w.json
└── sub-09114_ses-1pre_T1w.html
Log files can be found in nipoppy_example/logs/run/mriqc-23.1.0.
Step 5: Track the pipeline processing status
Run nipoppy track to determine the MRIQC processing status for each subject and session:
nipoppy track --pipeline mriqc --pipeline-version 23.1.0 nipoppy_exampleThe command will create an imaging bagel file at nipoppy_example/derivatives/imaging_bagel.tsv. After running MRIQC for a single participant and session, the file looks like this:
participant_id  bids_participant_id     session_id  pipeline_name   pipeline_version    pipeline_step   bids_session_id     status
09114           sub-09114               1pre        mriqc           23.1.0              default         ses-1pre            SUCCESS
09114           sub-09114               2post       mriqc           23.1.0              default         ses-2post           FAIL
09160           sub-09160               1pre        mriqc           23.1.0              default         ses-1pre            FAIL
09160           sub-09160               2post       mriqc           23.1.0              default         ses-2post           FAIL
09260           sub-09260               1pre        mriqc           23.1.0              default         ses-1pre            FAIL
09260           sub-09260               2post       mriqc           23.1.0              default         ses-2post           FAIL
09300           sub-09300               1pre        mriqc           23.1.0              default         ses-1pre            FAIL
09300           sub-09300               2post       mriqc           23.1.0              default         ses-2post           FAIL
09380           sub-09380               1pre        mriqc           23.1.0              default         ses-1pre            FAIL
09380           sub-09380               2post       mriqc           23.1.0              default         ses-2post           FAIL
09381           sub-09381               1pre        mriqc           23.1.0              default         ses-1pre            FAIL
09381           sub-09381               2post       mriqc           23.1.0              default         ses-2post           FAIL
10134           sub-10134               1pre        mriqc           23.1.0              default         ses-1pre            FAIL
10134           sub-10134               2post       mriqc           23.1.0              default         ses-2post           FAIL
10332           sub-10332               1pre        mriqc           23.1.0              default         ses-1pre            FAIL
10332           sub-10332               2post       mriqc           23.1.0              default         ses-2post           FAIL
10570           sub-10570               1pre        mriqc           23.1.0              default         ses-1pre            FAIL
10570           sub-10570               2post       mriqc           23.1.0              default         ses-2post           FAIL
Running nipoppy status again will show that one participant has completed processing for the first session:
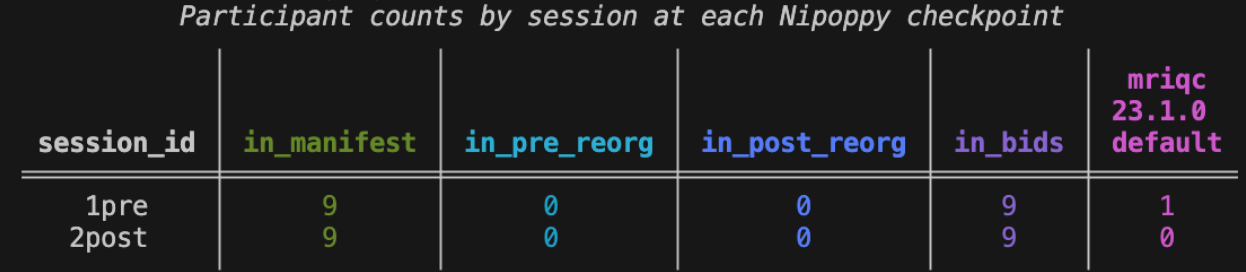
The imaging bagel file can also be uploaded to the Neurobagel digest dashboard, which will produce interactive visualizations of pipeline processing statuses.
Finally, this file can be used directly as input to the Neurobagel CLI when generating participant-level metadata about processing pipeline results.
Step 6 (optional): Run MRIQC on the rest of the dataset
Use nipoppy run without the participant and session flags to process the rest of the dataset (in a loop). This will skip the participant-session that has previously been run successfully.
nipoppy run --pipeline mriqc --pipeline-version 23.1.0 nipoppy_exampleConclusion
In this tutorial, we ran a neuroimaging pipeline (MRIQC) on a small BIDS dataset, showcasing how Nipoppy keeps track of which participants and sessions are available, and which ones have been processed already. Nipoppy offers a streamlined interface for configuring, running, and tracking virtually any pipeline (including custom ones). Beyond processing pipelines, Nipoppy can also be used to run pipelines for BIDS conversion and for extracting imaging-derived phenotypes (IDPs) from processing pipeline results.